
Goals and Tasks
Copyright © 2004-2014 by GoalEnforcer, SVT Systems. All rights reserved.
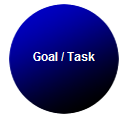
Bubble, balloon, circle, ball, sphere, token ... or whatever you want to call it.
This is the basic GoalEnforcer's object and it can be used to represent either a Goal or a Task.
Just like an artist, you start creating your Goal Plan by naming this object and bringing it to life.You then drag it around, change its properties, make more of it and even break it into more manageable sub-goals (or sub-tasks).
Quick Goalenforcer Help Reference
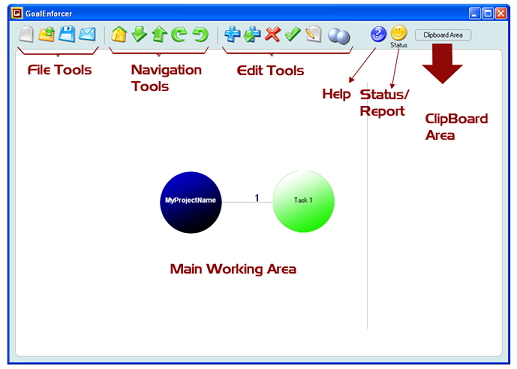
File Tools
| Click here to start a new project. Remember to save the current project before starting a new one. | |
| Open saved projects. | |
| Save project. You will be asked two options "Save" and "Save As". | |
| Email Status Report for the open project. You'll be asked for the email address. |

Navigation Tools
| Home. Go to project top level. | |
| Go down into the subgoals/subtasks for this goal/task. | |
| Go up, back one level to the parent goal/task. | |
| Highlight the next goal/task on the clockwise direction. | |
| Highlight the next goal/task on the counter-clockwise direction. |

Edit Tools
| Add new goal (or task) to the project. You'll be prompted for the goal (task) name. You can then drag the goal (task) to anywhere on the screen. | |
| Add a subgoal (subtask) level to the highlighted goal (task). You will move down into the (subgoal) subtask level just created for the highlighted goal. | |
| Delete the highlighted task from the project. | |
| Checkmark the task as completed. | |
| Edit the properties for the highlighted task. You can also do this by right clicking the mouse over the task. | |
| Clone. First select a task and then click the "Clone Button" to generate a copy of the task. |

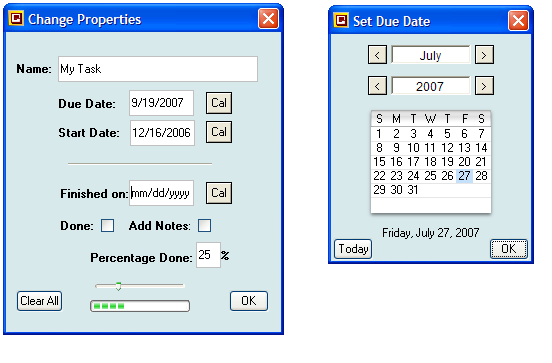
Clicking on "Cal" brings up the calendar window.
| Name | Enter (or change) the name for your goal or task. |
| Due Date | Enter the "Due Date" when the task should be completed. Click on "Cal" to bring up a calendar. |
| Start Date | Enter the "Start Date" when the task should be started. "Start Date" becomes the actual start date after the task starts. |
| Finished on | Enter the "Finished on" date, which is the actual date when you finished the task. The "Finished on" date is automatically set to today's date when you checkmark the project as completed. |
| Done | Checkmark this box when your task has been completed. The "Finished on" date is automatically set to today's date (you can change it if you want). |
| Add Notes | Checkmark this box to open a Notes field for your task. |
| Perc. Done |
Enter the percentage value or move the slider to set a value for tasks partially completed (in progress). |
| Clear All | Click this button to reset all the dates and Percentage Done. The task name remains unchanged." |
Calendar Control
Click on "OK" to accept the values, and updated the task properties.
Clicking on the close box will dismiss the dialog and the properties will remain unchanged.

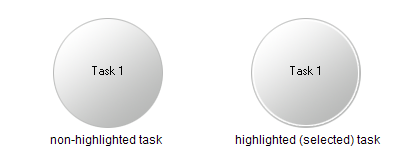
Highlighting a Goal/Task
Goals with SubGoals (Tasks with SubTasks)
Tasks which have subtasks appear with a blue ring around its circle, meaning that you can navigate one level down into its subtask level, by either double clicking the mouse over the task, or clicking on the Go Down button (Go Down arrow) on the Navigation Tools.
In order to highlight (select) a task, just click the mouse over the task. A clear ring will appear on the task's border.

Status Monitor
A Smiley Face shows that your progress is OK, there are no overdue tasks.

Attention: a Panic Face tells that you have one or more overdue tasks. Not OK!
Status Report
Clicking on the Status Monitor (either the Happy Face or the Panic Face) will bring you to the Status Report Window.
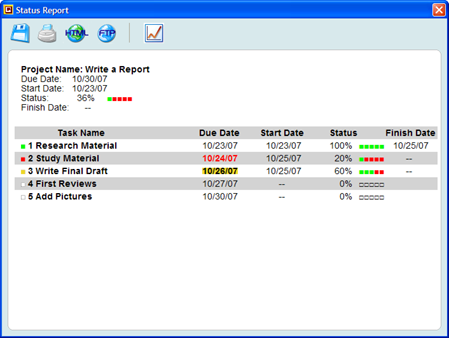

Save/Export Report: you can select HTML, Plain Text, CSV (for spreadsheets such as Excel) or XML format.
Print Report.
View HTML Report: open the Status Report in your browser.
Upload Report to a Website using FTP.
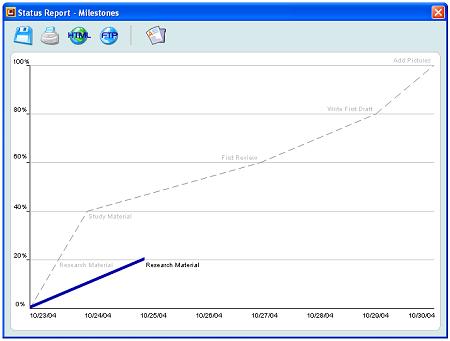
View Progress Chart.

Back to Status Report.
Main Working Area
That's where you design your project by adding new tasks and dragging them around. After you add a new task by clicking on "Add New Task" and entering its name (see Edit tools above), you can drag it by placing the mouse over the task, and clicking and holding its left button down while you move it around.
The dark blue central circle represents the project, if you are at the top level, or the parent task, if you are at a subtask level.
When you approach a task to the dark blue central circle (project or parent task), at some point a straight line link will appear, connecting the task to the central circle. This means that the task now belongs to the project (or the subtask now belongs to the parent task).
Each task is assigned a number when you connect it to the project (or parent task), for reference purposes only. You can still move it around, switch position with other tasks, and disconnect it after it has been connected.
The last task in the number sequence is the anchor (fixed position). In order to replace the anchor, just bring another task close to it coming from its right side.
Clipboard Area
You can use the Clipboard Area to transfer tasks between different levels. For example, if you have a Task A, which belongs to the top level (project main level), and you want to transfer it to a subtask level, just drag it to the Clipboard Area, navigate to the desired subtask level, and then drag the task back to the Main Working Area.
Goal/Task Color Code
Different colors are used to help you identify task status:
Tasks can also show dates (if they have any). A due date will appear at the bottom, while a start date will appear at the top. A task in progress will show its percentage done value.

Done: task has been completed!
Attention: task due today or running behind (less progress than expected).
Immediate attention: overdue task!
OK: task in progress.
OK: future task (work hasn't started yet, not due).
Do you want to learn how to use the new GoalEnforcer Hyperfocus and other advanced features? Check the new "How-to Lessons."